Today’s handwork course will focus on a tutorial for desoldering and soldering the iPhone X PMU. Begin by attaching the upper layer of the motherboard to the PCB Holder, then proceed to apply High-temperature Tape on the surrounding components.
![mastering desoldering & soldering of iphone x pmu aa3fa59a 13f1 4b3e 8748 6c41b88c8ca0 H023 Desoldering&Sol[00 00 25][20210917 185409]](https://s.rewa.tech/image/aa3fa59a-13f1-4b3e-8748-6c41b88c8ca0-H023 Desoldering&Sol[00_00_25][20210917-185409].jpg)
Start by removing the black adhesive surrounding the PMU. Apply heat using a Hot Air Gun set at 280℃ with an air flow of 3. Then, use a specialized knife to get rid of the black adhesive around the chip.
![mastering desoldering & soldering of iphone x pmu f74c4628 d9f6 430c 8852 b72b8611722e H023 Desoldering&Sol[00 00 42][20210917 185422]](https://s.rewa.tech/image/f74c4628-d9f6-430c-8852-b72b8611722e-H023 Desoldering&Sol[00_00_42][20210917-185422].jpg)
Precaución: When removing the black adhesive near the PMU to prevent dislodging any nearby components.
Apply heat to the PMU using a Hot Air Gun set at 330℃ with an air flow of 5. Prior to heating, secure one end of the tweezers. After 15 seconds, when the solder begins to melt, swiftly lift the chip using the other end of the tweezers. Ensure that you lift the chip at the appropriate moment to avoid causing damage to the bonding pad.
![mastering desoldering & soldering of iphone x pmu e9919ced e79e 4205 a937 cc0585d6db4e H023 Desoldering&Sol[00 01 32][20210917 185557]](https://s.rewa.tech/image/e9919ced-e79e-4205-a937-cc0585d6db4e-H023 Desoldering&Sol[00_01_32][20210917-185557].jpg)
![mastering desoldering & soldering of iphone x pmu 07ea529d 2e8e 4f26 a457 e32fa1c3b8fb H023 Desoldering&Sol[00 01 38][20210917 185454]](https://s.rewa.tech/image/07ea529d-2e8e-4f26-a457-e32fa1c3b8fb-H023 Desoldering&Sol[00_01_38][20210917-185454].jpg)
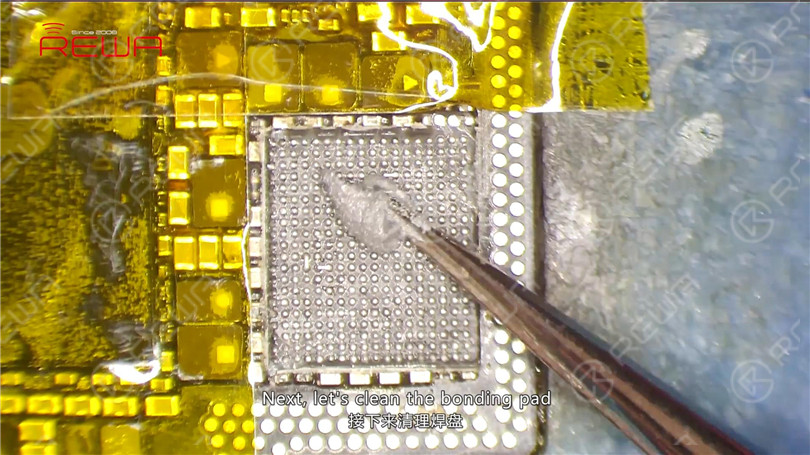
Next, let’s clean the bonding pad. Apply some mid-temperature Solder Paste to the bonding pad. Heat with Hot Air Gun at 280℃. Meantime, clean the bonding pad with Soldering Iron at 360℃. Continue to clean the bonding pad with rosin soaked Solder Wick. Clean with PCB Cleaner afterwards. Tips: bonding pads of those empty pins might get knocked off the board when cleaning the bonding pad, which is normal. We can just leave them alone.
![mastering desoldering & soldering of iphone x pmu a1d1332d 5e87 465c aa2f b31b43b32801 H023 Desoldering&Sol[00 02 32][20210917 185616]](https://s.rewa.tech/image/a1d1332d-5e87-465c-aa2f-b31b43b32801-H023 Desoldering&Sol[00_02_32][20210917-185616].jpg)
![mastering desoldering & soldering of iphone x pmu d0cb7093 fdbe 42d6 b841 ef5dd0da9603 H023 Desoldering&Sol[00 02 39][20210917 185703]](https://s.rewa.tech/image/d0cb7093-fdbe-42d6-b841-ef5dd0da9603-H023 Desoldering&Sol[00_02_39][20210917-185703].jpg)
![mastering desoldering & soldering of iphone x pmu 6b9e1e27 9274 4e8c a6c4 860af55b076d H023 Desoldering&Sol[00 03 15][20210917 185710]](https://s.rewa.tech/image/6b9e1e27-9274-4e8c-a6c4-860af55b076d-H023 Desoldering&Sol[00_03_15][20210917-185710].jpg)
Continue to remove black adhesive on/around the bonding pad. Also when we pry up the chip, components around get knocked off the board. So our next move is to re-solder these components. First, apply some Paste Flux to their bonding pads. Then, apply solders with Soldering Iron. Get these components in position. And then solder with Hot Air Gun at 330℃, air flow 3.
![mastering desoldering & soldering of iphone x pmu 77bfd3bd 4348 4383 905b 541957858de8 H023 Desoldering&Sol[00 03 42][20210917 185734]](https://s.rewa.tech/image/77bfd3bd-4348-4383-905b-541957858de8-H023 Desoldering&Sol[00_03_42][20210917-185734].jpg)
![mastering desoldering & soldering of iphone x pmu 51810e70 a0e2 40b5 8e6b 3a207f03aa5a H023 Desoldering&Sol[00 05 16][20210917 185755]](https://s.rewa.tech/image/51810e70-a0e2-40b5-8e6b-3a207f03aa5a-H023 Desoldering&Sol[00_05_16][20210917-185755].jpg)
Before soldering the chip, clean the bonding pad again. Clean with PCB Cleaner afterwards.
![mastering desoldering & soldering of iphone x pmu d5deacf6 e4d9 4071 9e03 107755a58a9b H023 Desoldering&Sol[00 05 31][20210917 185802]](https://s.rewa.tech/image/d5deacf6-e4d9-4071-9e03-107755a58a9b-H023 Desoldering&Sol[00_05_31][20210917-185802].jpg)
![mastering desoldering & soldering of iphone x pmu cb97da21 093c 4c41 9a48 a49cf21a60e7 H023 Desoldering&Sol[00 05 41][20210917 185808]](https://s.rewa.tech/image/cb97da21-093c-4c41-9a48-a49cf21a60e7-H023 Desoldering&Sol[00_05_41][20210917-185808].jpg)
Also when we remove the black adhesive, some of the insulation varnish on PCB has fallen off the board. So we need to remedy with the UV Curable Solder Mask. Dip some UV Curable Solder Mask with tweezers. And apply the solder mask to the exposed area. Then, solidify with the UV Dryer Lamp for 5 minutes.
![mastering desoldering & soldering of iphone x pmu c596e5bc b8c2 4559 84a1 bbf54491f696 H023 Desoldering&Sol[00 06 12][20210917 185813]](hhttps://s.rewa.tech/image/c596e5bc-b8c2-4559-84a1-bbf54491f696-H023 Desoldering&Sol[00_06_12][20210917-185813].jpg)
![mastering desoldering & soldering of iphone x pmu 4f39bfff 5adf 4e1f 9f75 871d23a63660 H023 Desoldering&Sol[00 06 52][20210917 185819]](https://s.rewa.tech/image/4f39bfff-5adf-4e1f-9f75-871d23a63660-H023 Desoldering&Sol[00_06_52][20210917-185819].jpg)
Now we can solder the PMU. Apply some Paste Flux to the bonding pad. Get a new PMU in position. Make sure you put it in the right direction. Solder with Hot Air Gun at 330℃, air flow 3 for 20s.
![mastering desoldering & soldering of iphone x pmu 3157ea38 8906 484f 8ef1 22afaadf1545 H023 Desoldering&Sol[00 07 08][20210917 185858]](https://s.rewa.tech/image/3157ea38-8906-484f-8ef1-22afaadf1545-H023 Desoldering&Sol[00_07_08][20210917-185858].jpg)
With the chip sinking and Paste Flux flowing, continue heating for 10s. Wait for the upper layer to cool for 5 minutes. Tear off the High Temperature Tape. Clean with PCB Cleaner afterwards. iPhone X PMU soldering and desoldering completed successfully.
![mastering desoldering & soldering of iphone x pmu 9148a600 e8be 4197 a6e6 214fe2478cb7 H023 Desoldering&Sol[00 08 12][20210917 185834]](https://s.rewa.tech/image/9148a600-e8be-4197-a6e6-214fe2478cb7-H023 Desoldering&Sol[00_08_12][20210917-185834].jpg)
